Robots.txt is a text file used by websites to communicate with web crawlers and other automated agents, specifying which areas of the site should not be processed or scanned. It serves as a set of guidelines for search engines and other bots, instructing them on how to interact with the website’s content.
Understanding the Basics
The Robots.txt file is placed in the root directory of a website and is publicly accessible. Its primary purpose is to prevent certain parts of a site from being crawled or indexed, helping site owners control the visibility of specific content in search engine results.
The file consists of a series of directives, each followed by a value. Two common directives are Disallow and Allow. The Disallow directive tells crawlers which paths or directories to avoid while Allow instructing them to access specific areas that might otherwise be restricted.
Disallow Values and Wildcards
Disallow Values
Specific Path:
Disallow: /private-section/
In this example, the entire “private-section” directory is off-limits to crawlers.
Wildcards:
* (Asterisk) – Represents any sequence of characters.
Disallow: /images/*.jpg
This disallows all JPEG images in the “images” directory.
$ (Dollar Sign) – Matches the end of the URL.
Disallow: /docs$
This disallows any URL ending with “/docs”.
? (Question Mark) – Represents a single character.
Disallow: /temp?file=*
This disallows URLs with a query parameter “file” in the “temp” directory.
Allow Values with Partial Paths
Allowing Specific Paths:
Allow: /public-section/
This allows crawlers to access the “public-section” directory.
In this case, crawling is disallowed in the “private-section” directory but allowed in the “public-subsection” subdirectory.
Best Practices
Be cautious with the use of wildcards, as they can have unintended consequences if not used carefully.
Regularly update and review the Robots.txt file to ensure it aligns with the current structure and content of the website.
Test the file using online tools to verify its effectiveness in controlling crawler access.
Conclusion
Robots.txt is a powerful tool for website owners to influence how search engines and other automated agents interact with their content. By understanding the various directives and values, site administrators can fine-tune the visibility of their pages in search engine results and maintain control over which parts of their site are accessible to web crawlers.
Radio buttons are a fundamental part of web forms, allowing users to make single selections from a list of options. Often, developers attach event listeners to radio buttons to capture when a user makes a choice. However, there may be instances where the change event listener on a radio button mysteriously disappears, causing unexpected issues. In this blog post, we will explore why this happens and how to fix it. Additionally, we will delve into the difference between $('selector').change(function () {}) and $('parentselector').on('change', 'selector', function () {}) in jQuery.
Why Does the Change Event Listener Disappear?
The disappearance of a change event listener on a radio button can be attributed to dynamic changes in the Document Object Model (DOM). When event listeners are attached directly to specific elements, they become tightly bound to those elements. If those elements are removed or replaced in the DOM, the event listeners become detached and cease to function.
Common scenarios where this issue may arise include:
Dynamic Element Replacement: If you replace a radio button element with a new one using JavaScript, the event listener attached to the old element will no longer apply to the new element.
AJAX Requests: When content is loaded via AJAX requests and parts of the page are replaced or updated, any event listeners on the replaced elements may get detached.
Single-Page Applications (SPAs): In SPAs, where content is frequently updated without full page reloads, event listeners can become detached when elements are replaced.
How to Fix the Disappearing Change Event Listener: Event Delegation
To ensure that your change event listener remains functional even when the DOM changes dynamically, you can use a technique called event delegation. Event delegation involves attaching the event listener to a higher-level parent element that remains constant in the DOM. This parent element then listens for events that bubble up from child elements, even those added or removed dynamically.
Here’s how to fix the issue using event delegation in jQuery:
$(document).ready(function () {
    // Attach the event listener to a parent element that exists in the DOM
    $('.parent-container').on('change', 'input[name="yourRadioButtonName"]', function () {
        // Your code here to handle the radio button change
    });
});
By using event delegation, you ensure that your event listener remains attached to a stable parent element. It can capture events from child elements, including radio buttons, regardless of how the DOM changes.
Difference between $('selector').change(function () {}) and $('parentselector').on('change', 'selector', function () {})
Let’s clarify the key differences between these two approaches:
$('selector').change(function () {}):
Attaches the event handler directly to elements that match the selector.
Only works for elements that are present in the DOM at the time of execution.
Event handlers do not automatically apply to dynamically added elements matching the selector.
Suitable when dealing with static DOM elements that won’t change dynamically.
$('parentselector').on('change', 'selector', function () {}):
Utilizes event delegation by attaching the event handler to a parent element.
Works for both existing and dynamically added elements matching the selector.
Remains effective even when the DOM structure changes dynamically.
Ideal for scenarios involving dynamic DOM changes, such as AJAX updates or SPAs.
In Conclusion:
Understanding the reasons behind the disappearance of change event listeners on radio buttons and how to fix it with event delegation is crucial for web developers. Event delegation ensures that your event handlers remain robust, even as the DOM evolves. Additionally, being aware of the differences between direct attachment and event delegation in jQuery helps you choose the right approach for your specific use cases, making your code more reliable and adaptable.
Recently I got my docker updated to the latest version i.e. I uninstalled and installed the latest docker. I started getting the below error upon docker compose.
failed to register layer: cannot create layer with missing parent id CreateFile C:\ProgramData\Docker\windowsfilter\Id: The system cannot find the file specified.
Solution:
Here are the steps that worked for me.
Uninstall Docker.
Restart the system.
Delete these folders - C:\ProgramData\Docker and C:\ProgramData\DockerDesktop. It won't be able to delete a folder from C:\ProgramData\Docker\windowsfilter. Rest continue to delete and complete it.
Install Docker.
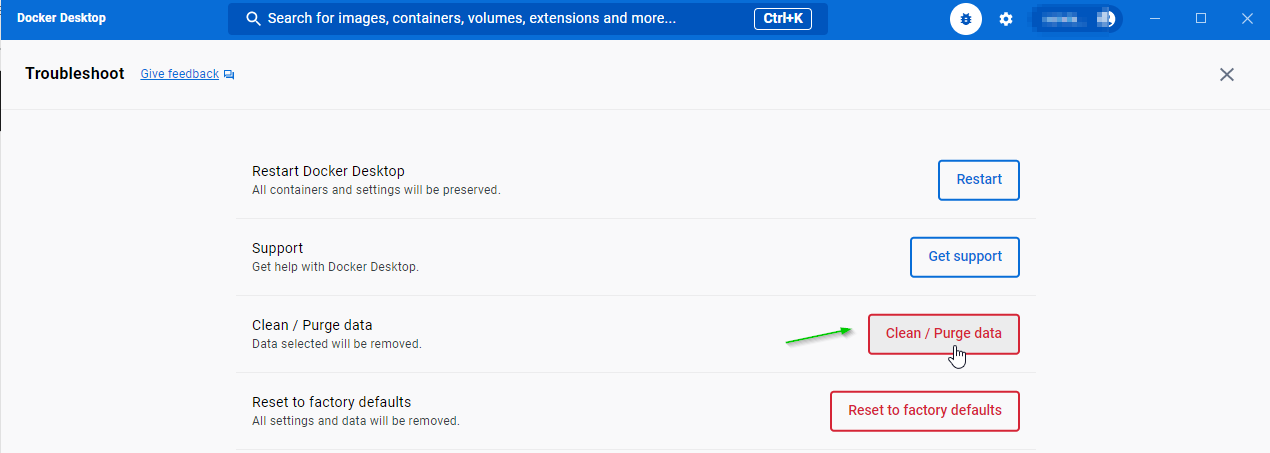
Start Docker and go to Troubleshoot window.
Click "Clean / Purge data".
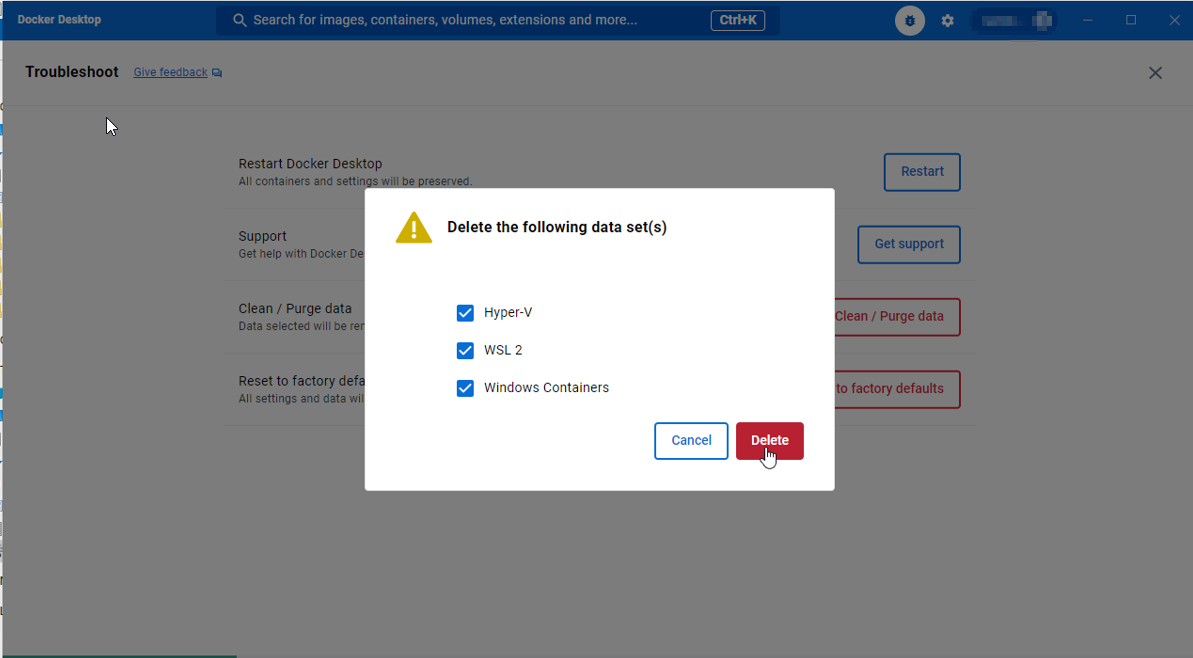
Select all the options and delete. Let it continue as it take time to delete. Note Do not click on the grey area else this window will go away. Not sure if it still runs in the background.
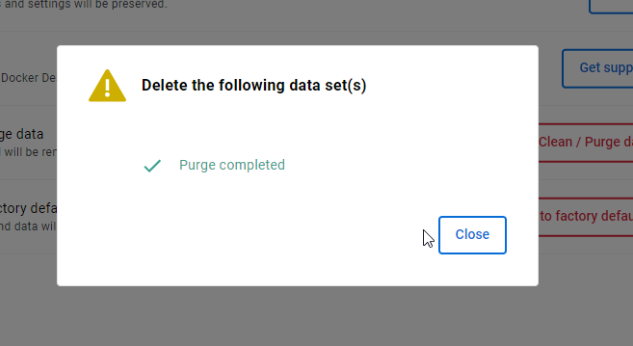
Close once below window is shown. Restart the system.
This is the key step as it also deletes the remaining files from C:\ProgramData\Docker\windowsfilter which we were not able to delete.
Run the docker commands to build and run the containers. It worked!
Challenge: I recently cloned one of the project from github for research. However some of the projects were not loading, and also did not give good error to check on. Then I tried loading that particular project in a separate visual studio, and then got below error.
The imported project “C:\Program Files (x86)\Microsoft Visual Studio\2019\Professional\MSBuild\Microsoft\VisualStudio\v14.0\WebApplications\Microsoft.WebApplication.targets” was not found.
However the suggestion did not work in my case and if the suggestion did not work in your case as well then copy all the files from folder “C:\Program Files (x86)\Microsoft Visual Studio\2019\Professional\MSBuild\Microsoft\VisualStudio\v16.0” and paste into folder “C:\Program Files (x86)\MSBuild\Microsoft\VisualStudio\v14.0”.
Challenge/Issue: .NET Project was building successfully but fails on azure build server. Following is the error. Error CS8652 The feature ‘top-level statements’ is currently in Preview and unsupported. To use Preview features, use the ‘preview’ language version. Error CS1513 } expected Error CS1022 Type or namespace definition, or end-of-file expected
Solution: Locally we usually build with Debug mode. In Azure it builds with release mode as configured. So, we tried build the solution with release mode and the issue is reproduced. It was related to conditional compiler constants which was declared for Debug mode only. We gave for release mode and it is able to build successfully in local as well as build server in release mode.
DefineConstants (.NET) – Defines conditional compiler constants. Symbol/value pairs are separated by semicolons and are specified by using the following syntax: symbol1 = value1 ; symbol2 = value2 The property is equivalent to the /define compiler switch.
Analysis/Steps to reproduce the issue: Create sample console application. So, you have below code.
using System;
 namespace ConsoleApp1
 {
     class Program
     {
         static void Main(string[] args)
         {
             Console.WriteLine("Hello World!");
         }
     }
 }
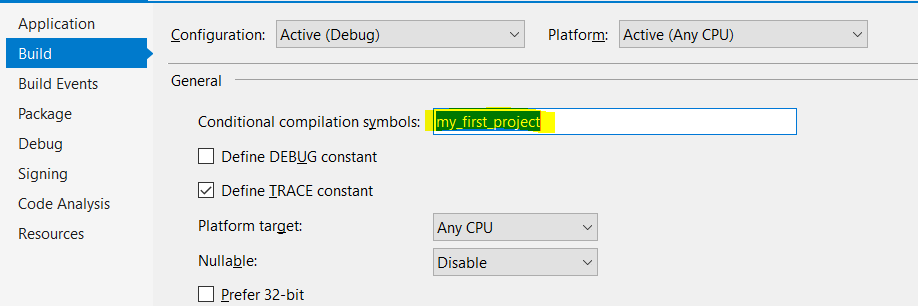
Now select the project node, Project > Project properties. Click “Build” tab. Provide some value like my_first_project as shown below.
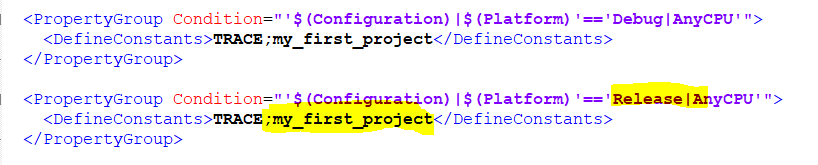
This will add entries in csproj as below.
Let’s say we used these constants for determining namespace as below.
using System;
 if my_first_project
 namespace ConsoleApp1
 elif my_second_project
 namespace ConsoleApp2
 endif
 {
     class Program
     {
         static void Main(string[] args)
         {
             Console.WriteLine("Hello World!");
         }
     }
 }
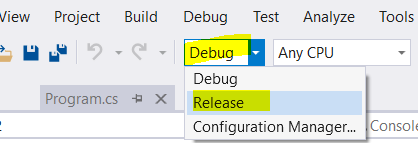
This builds successfully in debug mode. Now change the build mode to release.
Now the issue is reproduced. You should see the errors in Error List window.
To resolve this go to Project properties > Build tab. Change configuration to Release and provide constant in Conditional compilation symbols as shown below. Save it. You should now see no error, be able to build successfully.
This will update csproj as below.
Please let me know your feedback in comments below.
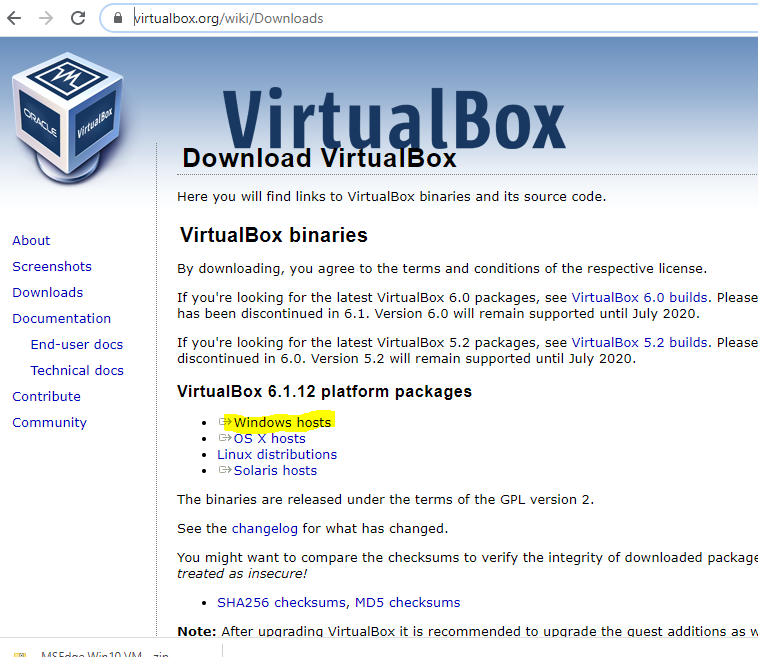
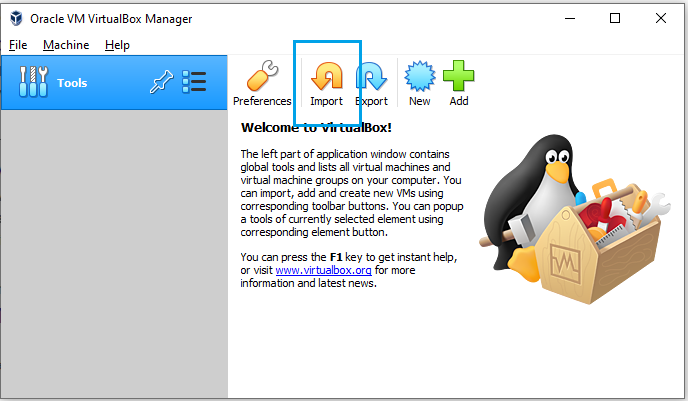
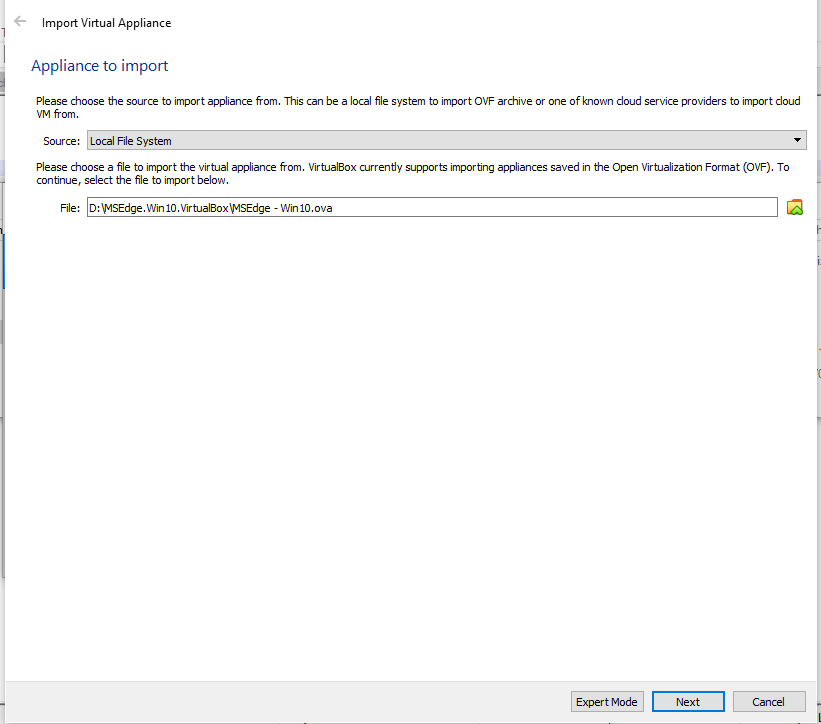
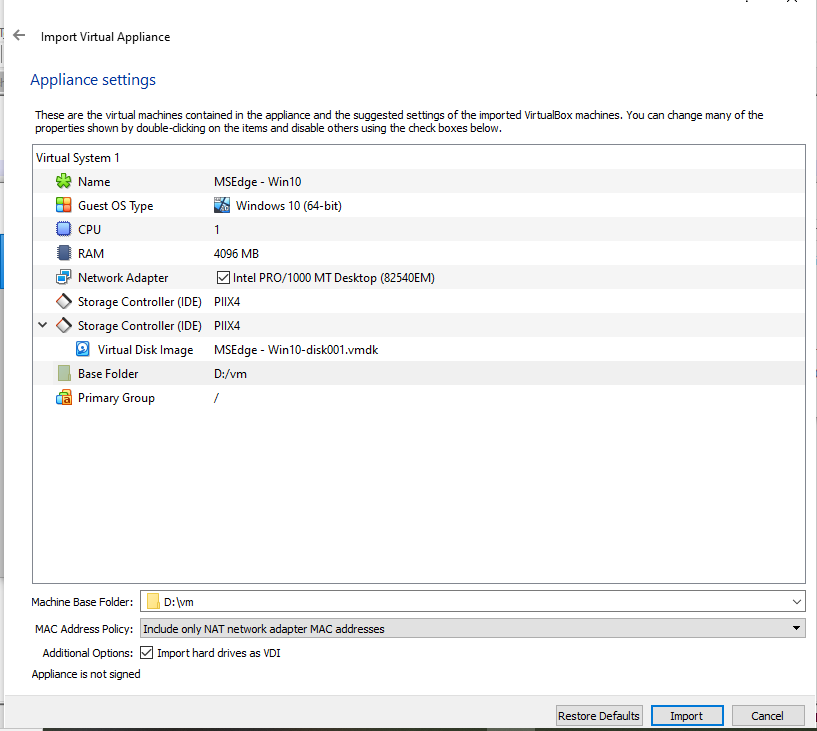
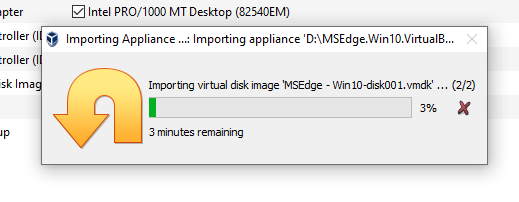
Download VM zip file by clicking VirtualBox link. Extract the zip file.
Before installing, please note:
These virtual machines expire after 90 days. We recommend setting a snapshot when you first install the virtual machine which you can roll back to later. Mac users will need to use a tool that supports zip64, like The Unarchiver, to unzip the files. The password to your VM is “Passw0rd!”
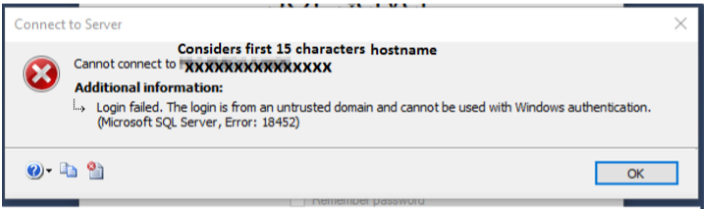
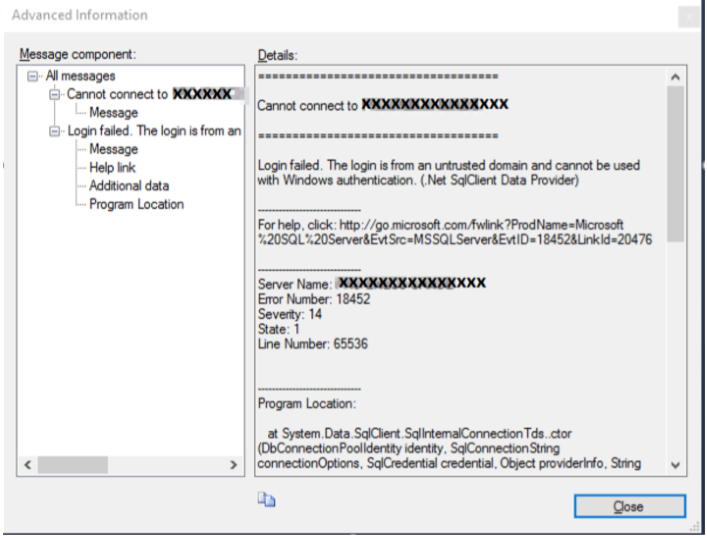
Challenge: One fine day I got a new machine. I was very happy and started installing all stus I needed to work. I installed MSSQL server and Management Studio. I tried to login but failed and got below alert message.
Cannot connect to xxxxxxxxxxxxxxx. Login failed. The login is from an untrusted domain and cannot be used with Windows authentication. (Microso SQL Server, Error: 18452) It was then clear to me that every time we setup project or install soware needed to work we developers always face some minor and major issues, which is nothing but an opportunity to learn something 😊
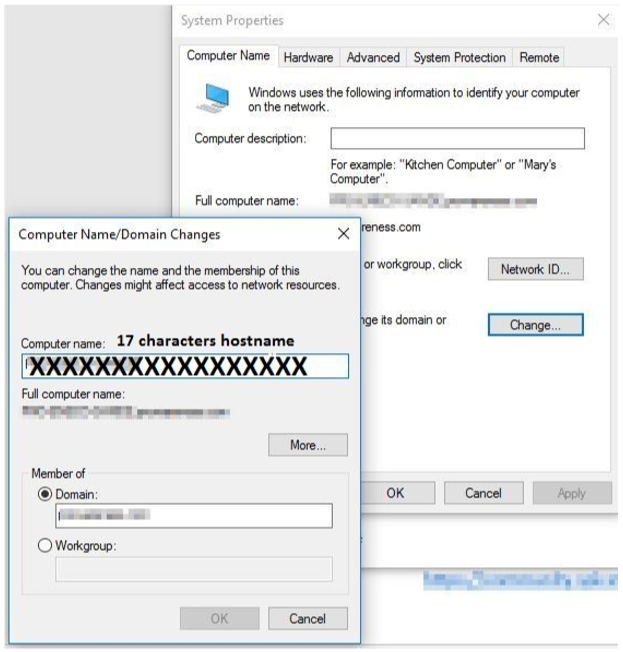
Solution/Analysis: Here the hostname is showing 15 characters. When I checked the hostname in computer settings, it was 17 characters.
So, the actual hostname is of 17 characters but applications used to consider max 15 characters of hostname. I then realized there must be some standard limit for characters in hostname.
This post explains how to include environment specific config files in regular ASP.NET Framework Visual studio project and build the same. This is also called as config transformation. Let’s start.
Open the Web application project in Visual studio or a create a new one. I have used VS2019. But this works VS2010 onward.
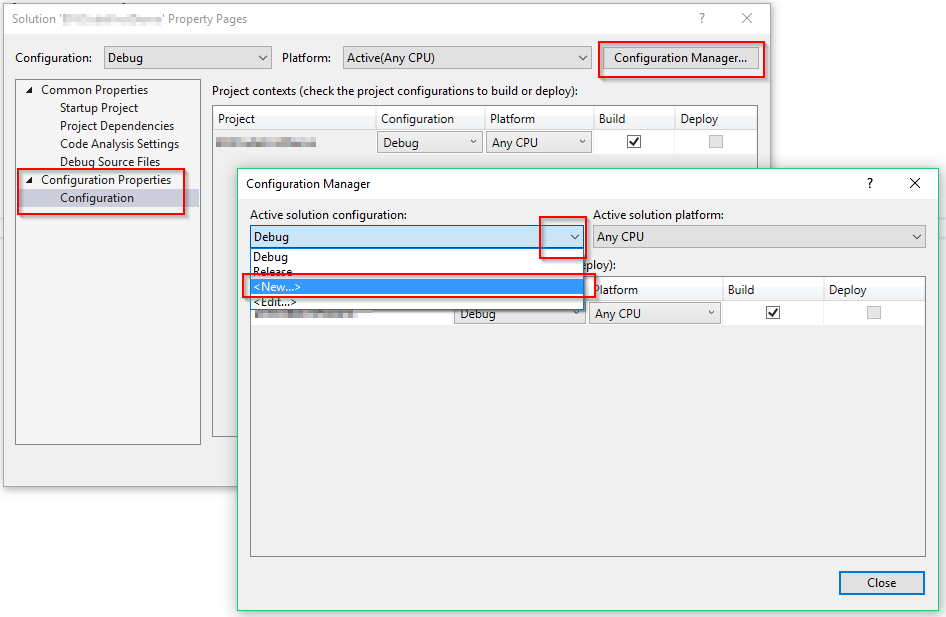
Right click the solution. Select ‘Properties’ from context menu. Expand ‘Configuration Properties’. Click ‘Configuration’. Click button ‘Configuration Manager’.
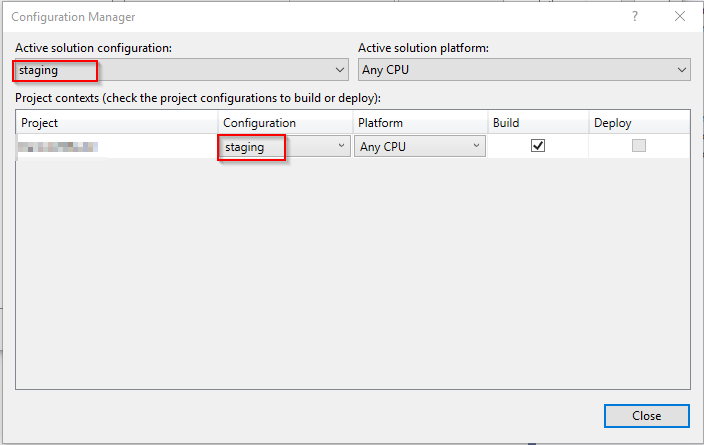
In new dialog – Configuration Manager, Select ‘New’ from the drop-down ‘Active solution configuration’.
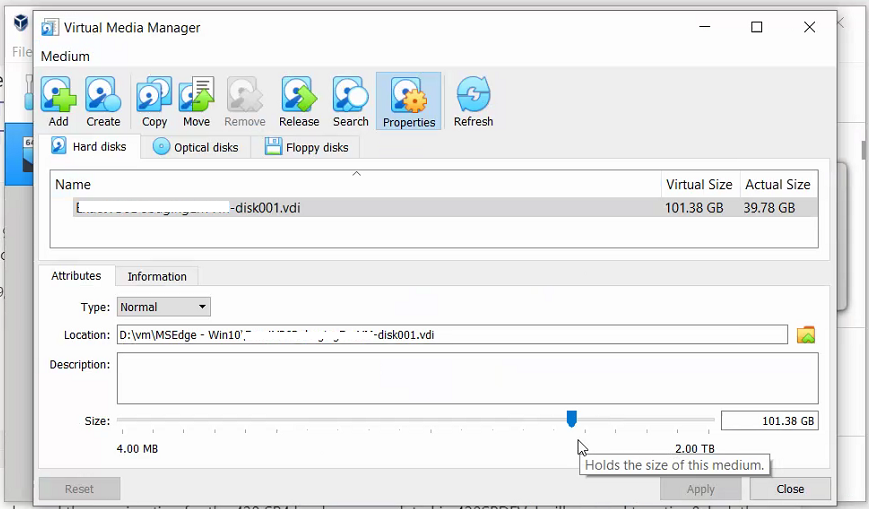
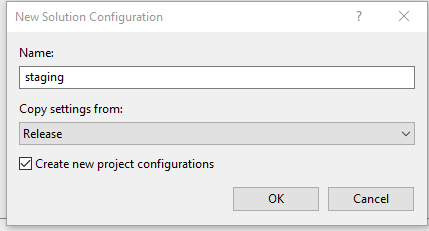
Provide the new environment name here. Let’s consider ‘staging’ for demo purpose. You may copy settings from existing configuration. I copied from ‘Release’ or you may create a new one. Check the checkbox for ‘Create new project configurations’. This will add the configuration at project level with the same name. In this case it is ‘staging’. You may add a new solution platform from second drop-down ‘Active solution platform’. You already have ‘Any CPU’ and ‘x64’. I selected ‘Any CPU’. Basically it is all about combinations of ‘Active solution configuration’ values and ‘Active solution platform’ values. So, make sure for every possible combinations, configuration names are same both at solution level and project level.
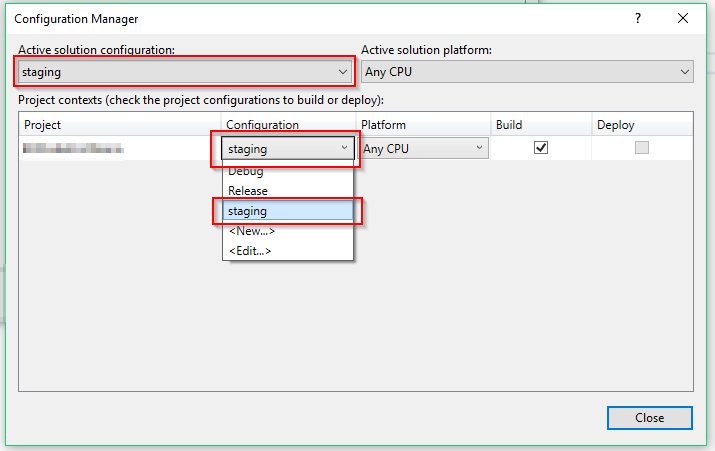
Here we make sure, for combinations at solution level i.e. staging | Any CPU and staging | x64, we have ‘staging’ configuration selected at project level too as below. These mappings are very important. Note that the given configuration from command line or selected configuration from visual studio is nothing but the solution configuration. And whatever project configuration is mapped with the solution level configuration will be applied for the project config files transformation. So, project configuration name decides what configuration transform file to pick, since $(Configuration) represents the mapped project configuration and not the solution configuration. This can be complicated so to keep things simple just make sure the corresponding project configuration name matches the respective solution configuration name.
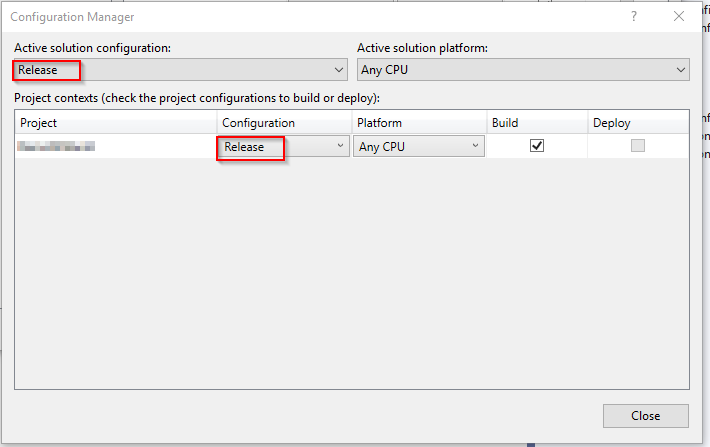
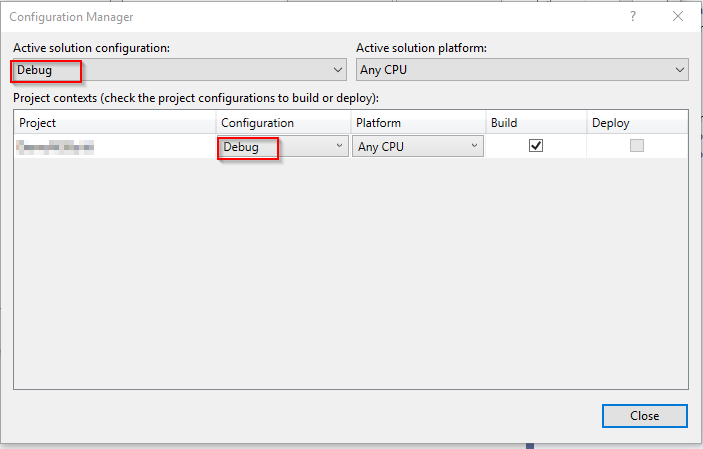
So, it should look like below for every possible combinations.
When you add a new configuration and close. Then the active solution configuration will change. Here from debug to staging will be set. So, if you don’t want this to happen then select the debug from drop-down of ‘Active solution configuration’ before you close this dialog else you can come back and change it.
Once you are done with the configuration manager, then go to Solution Explorer. Right click the web.config. Select ‘Add Config Transform’. Once you do this, Web.staging.config file would be added. Here you can add your settings or change the existing with respect to the base file – web.config. However if you add any other config file like app.config and right click them, you will not find this option. Please let me know in comments if you see it :). So, in this case we need to do it manually i.e. add required environment specific config files and add the details to csproj file.
So first, from Visual Studio, add the app.config file in root folder. Save all. Close the Visual Studio. Go to project folder where you see .csproj file. Create file named app.staging.config. Do this for all configuration if required. Good to have it created, otherwise it might throw error during build.
Now, open the csproj file in a notepad. Find below line.
<Content Include="app.config" />
Below this, add the entries for the newly added files as dependent files as shown below.
Now most important part comes, which does the transformation of the config files. Apart from config file references in csproj file. For each of the base file, you need to add the TransformXml task. Use target named ‘AfterBuild’ as below.
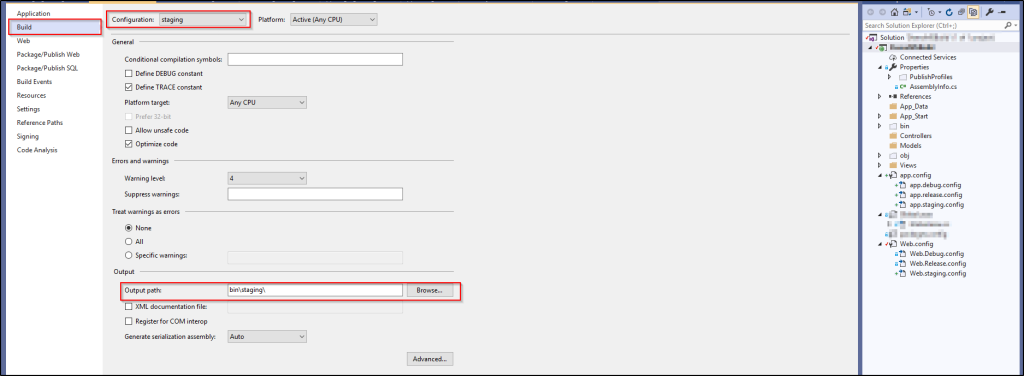
Now, open the project in Visual Studio. You can see dependent files below app.config. You may override the settings in these dependent files. Good to provide the configuration specific output folder path. Double click the properties. Go to build tab in left pane. Select the configuration from the drop-down and provide the Output path with backward slash in end.
Save all.
To build the solution, you may select the configuration from toolbar and right click the solution and select “Build solution” or Ctrl+Shift+B.
You could use the cmd to build the solution using MSBuild command.
C:\Program Files (x86)\Microsoft Visual Studio\2019\Community\MSBuild\Current\Bin>msbuild <sln file path>\<project>.sln /p:Configuration=staging /p:OutputPath=<path of folder where you want the build output>
That’s all. Hope you found this to be helpful. Please drop your comments below if any thoughts or suggestion.