Solr.NET – Getting started

Hi Folks!

This blog post is regarding the basics of SOLR setup and using the SOLR.Net.

So, let us get started!

Download the SOLR 5.5 from below URL. (You can give it a try with latest version else first use one)

https://archive.apache.org/dist/lucene/solr/5.5.0/

  • Extract the downloaded file to some location. In my case it is D:\learning\Search in dot net\solr-5.5.0.
  • Setup JAVA_HOME environment variable. To do so, follow this link.
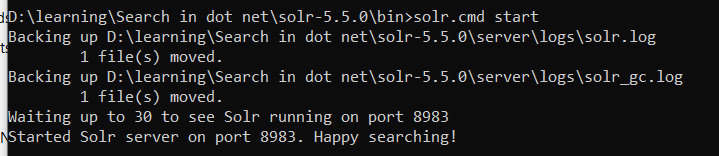
  • Open CMD as admin from the SOLR bin folder
  • You should find solr.cmd from SOLR bin folder. Run below command from cmd

>solr.cmd start

  • Open the below URL in any browser

http://localhost:8983/

  • Run below command to create the core

>solr.cmd create -c articles

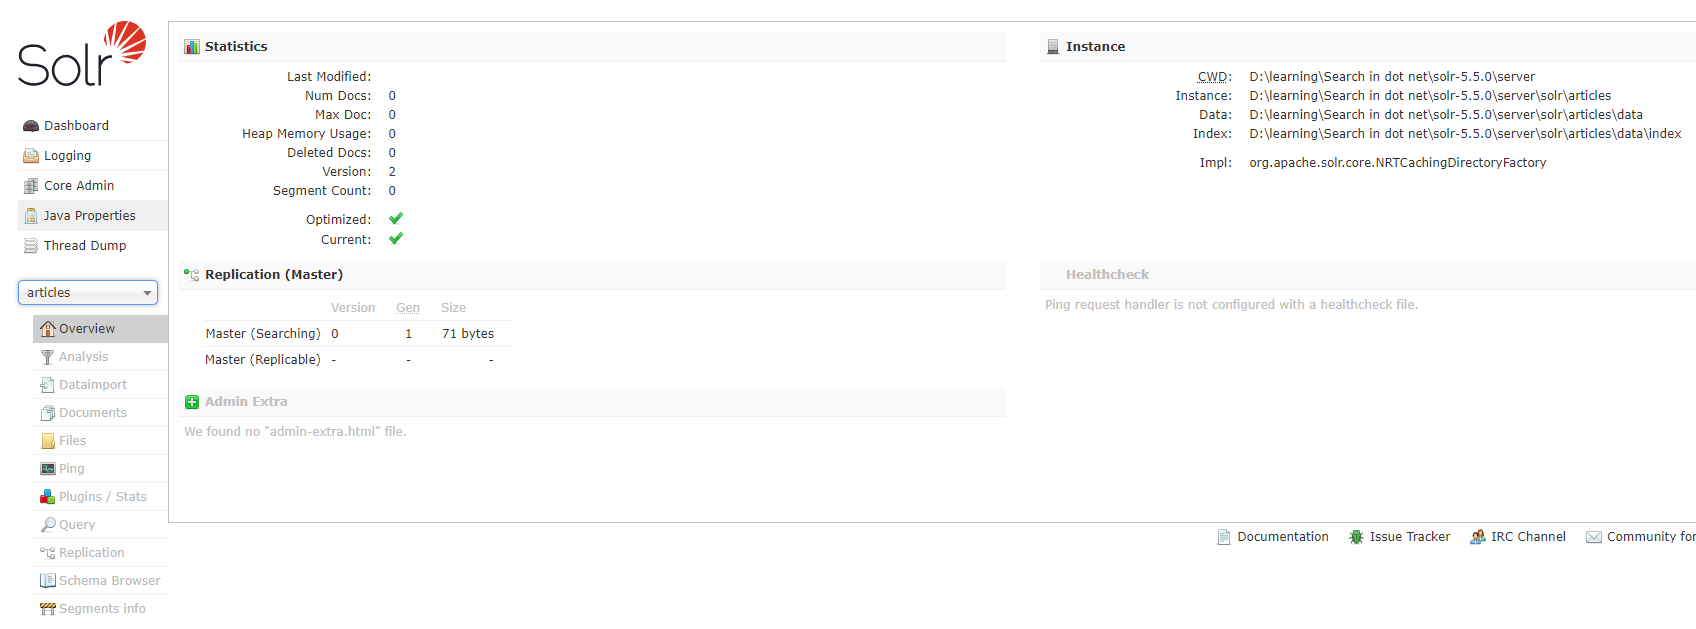
Go to http://localhost:8983/solr/#/

And refresh the page.

You should see the core created as above.

  • Create .NET framework console app.
  • Right click project node, go to nuget manager. Search for Solr.Net and install the latest stable package.
  • Copy below Article Class to your source file.
public class Article
    {
        [SolrUniqueKey("articleid")]
        public string CourseId { get; set; }

        [SolrField("articleTitle")]
        public string CourseTitle { get; set; }

        [SolrField("articleDescription")]
        public int DurationInSeconds { get; set; }

        [SolrField("publishDate")]
        public DateTime ReleaseDate { get; set; }

    }

  • Import required namespaces.
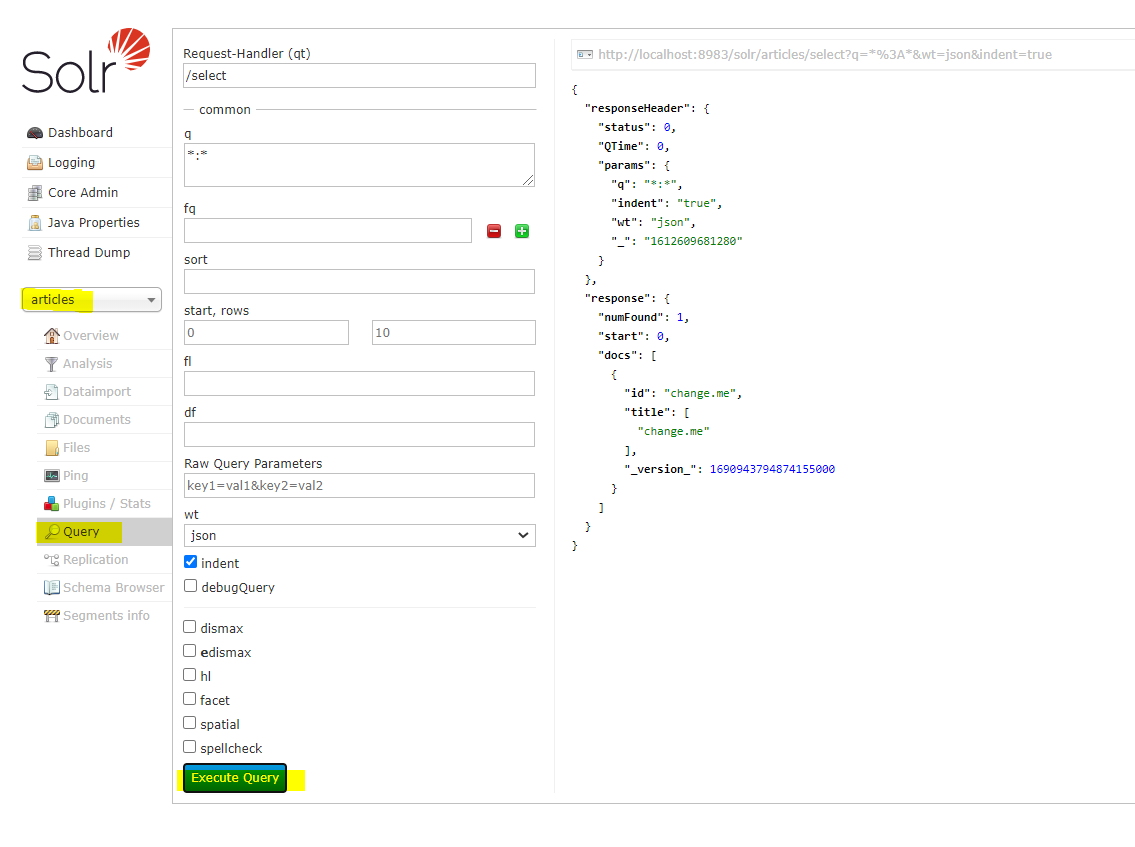
  • Go to below as highlighted to confirm we don’t have any data.
  • Write below code in your project
 class Program
    {
        static void Main(string[] args)
        {
            Console.WriteLine("Indexing the content");
            IndexArticles();
            Console.WriteLine("Searching the content");
        }

        private static void IndexArticles()
        {
            List<Article> allArticles = new List<Article>();
            FillAllArticles(allArticles);
            Startup.Init<Article>("http://localhost:8983/solr/articles");

            ISolrOperations<Article> solr = ServiceLocator.Current.GetInstance<ISolrOperations<Article>>();

            foreach (Article article in allArticles)
            {
                solr.Add(article);
            }

            solr.Commit();
        }

        private static void FillAllArticles(List<Article> allArticles)
        {
            allArticles.Add(new Article { Articleid=Guid.NewGuid().ToString(), ArticleDescription="article 1 descripton", ArticleTitle="article 1 title", PublishDate=DateTime.Now});
            allArticles.Add(new Article { Articleid = Guid.NewGuid().ToString(), ArticleDescription = "article 2 descripton", ArticleTitle = "article 2 title", PublishDate = DateTime.Now });
        }
    }

  • Build and execute the project.
  • Now go back to Solr Dashboard and refresh the core. You should see the inserted data.
  • Now comment out the first two lines in main method
            //Console.WriteLine("Indexing the content");
            //IndexArticles();
  • We will now read the data

Copy below code in your main method. Build and run it in debug mode for now.

   Startup.Init<Article>("http://localhost:8983/solr/articles");

            ISolrOperations<Article> solr = ServiceLocator.Current.GetInstance<ISolrOperations<Article>>();

            Console.WriteLine("Please enter search phrase:");
            string userInput = Console.ReadLine();

            while (!string.IsNullOrWhiteSpace(userInput))
            {
                SolrQueryResults<Article> Articles = solr.Query(userInput);

                int i = 0;
                foreach (Article Article in Articles)
                {
                    Console.WriteLine(i++ + ": " + Article.ArticleTitle + " "+ Article.ArticleDescription);
                }

                Console.WriteLine(Environment.NewLine + "Please enter search phrase:");
                userInput = Console.ReadLine();
            }

  • Enter search phrase and enter, you will get below error

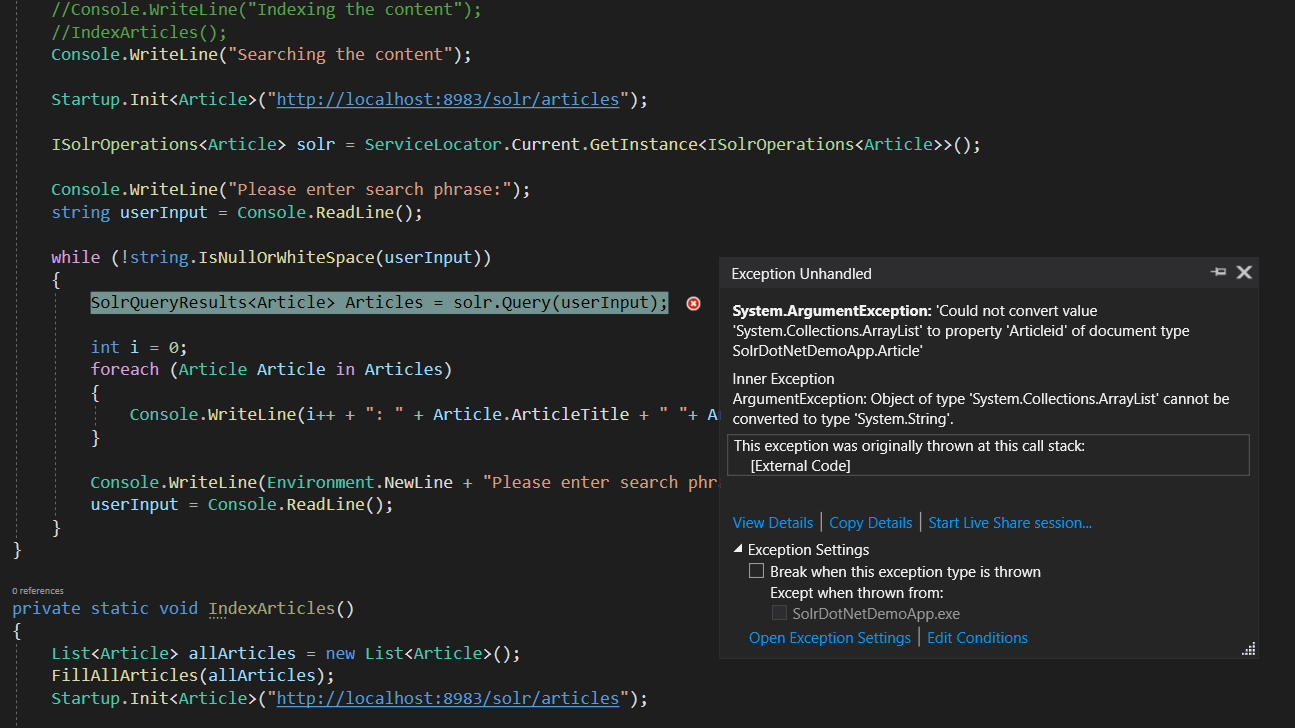
The reason is the configuration of article fields has multiValued = true by default.

  • Let us disable it from the configuration itself.

Go to article managed-schema file. In my case it is D:\learning\Search in dot net\solr-5.5.0\server\solr\articles\conf\managed-schema

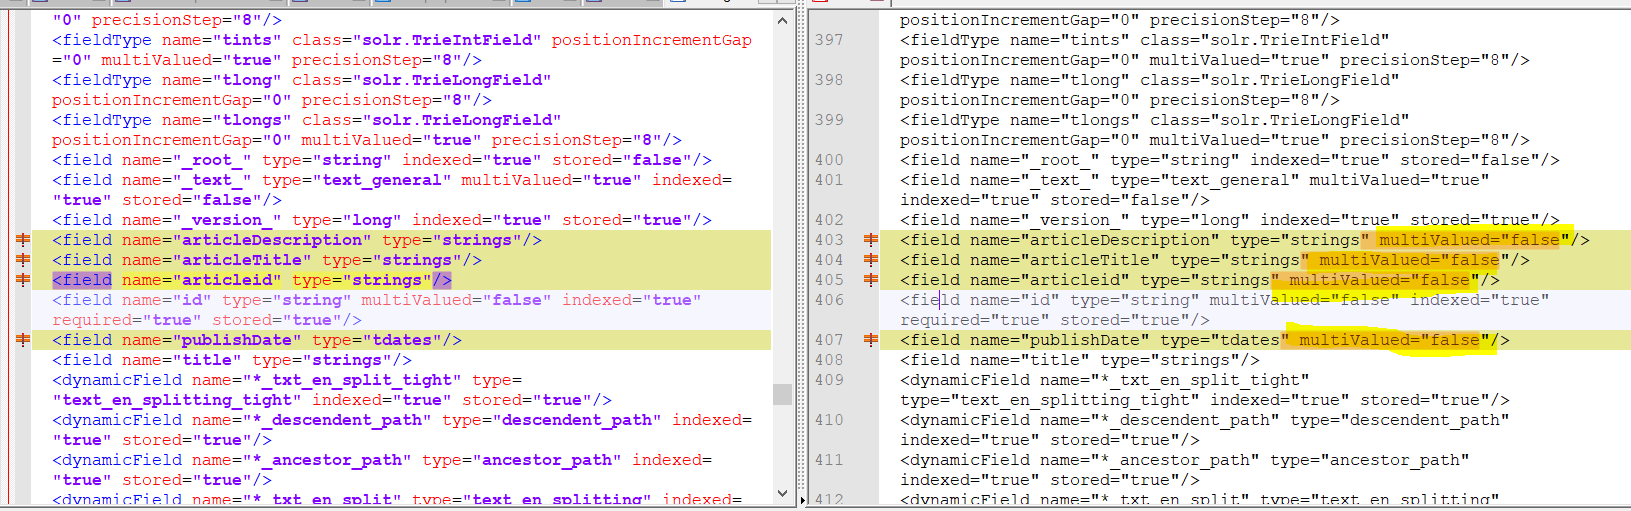
Provide multiValued=”false” to the above fields.

Save it.

  • To pick up new configuration we should restart the SOLR server. Close the cmd running the solr.
  • Open cmd as admin from SOLR bin folder. Run below command from cmd

>solr.cmd start

  • Now rerun the console application. We should be able to search.

Happy Basic Indexing and Searching!

Custom dependency resolver in regular ASP.NET Framework project

Challenge:

Implement dependency injection using IoC container – Inversion of control container (a.k.a DI container – Dependency Injection container) in ASP.NET MVC Framework project.

We will see how an IoC container like Microsoft.Extensions.DependencyInjection can be configured in the ASP.NET Framework project of MVC type.

Solution:

I have used Visual studio 2019, create a new project and add MVC and web API folder and code references. See below snapshots.

In this example, we have a property in a controller. We will try to inject IRepo instance to constructor of a controller. Consider below code for IRepo and DBRepo.

public interface IRepo
{
	string Content { get; set; }
}

public class DBRepo : IRepo
{
	private string _content;
	public string Content { get => this._content; set => this._content = value; }
}

Consider HomeController code as below.

public class HomeController : Controller
{
	public IRepo repo;

	public HomeController(IRepo vrepo)
	{
		this.repo = vrepo;
	}

	public ActionResult Index()
	{
		return View();
	}
}

This is only for demo purpose. You could provide your own inteface and its concrete class.

Install the nuget package – Microsoft.Extensions.DependencyInjection.

Add Global.asax file in the project if it does not exists.

Key place is the app_start in global.asax where our implementation is done. Most important code is as follows:

void Application_Start(object sender, EventArgs e)
{
	// Code that runs on application startup
	AreaRegistration.RegisterAllAreas();
	GlobalConfiguration.Configure(WebApiConfig.Register);
	RouteConfig.RegisterRoutes(RouteTable.Routes);

	var services = new ServiceCollection();
	services.AddTransient(typeof(IRepo), typeof(DBRepo));
	services.Add(typeof(HomeController), Lifetime.Transient);
	var defaultResolver = new DefaultDependencyResolver(services.BuildServiceProvider());

	/*
		Below code line is the key. Here we need to pass our instance implementing the desired IoC container. Since it accepts an instance of IDependencyResolver, we need to implement this interface. DefaultDependencyResolver code follows and implements the interface IDependencyResolver.

Basically, provides a registration point for dependency resolvers, using the specified dependency
        //     resolver interface.
	*/
	DependencyResolver.SetResolver(defaultResolver);  
}

And the implementation of DefaultDependencyResolver is as below.

public class DefaultDependencyResolver : IDependencyResolver
{
	private IServiceProvider serviceProvider;
	public DefaultDependencyResolver(IServiceProvider serviceProvider)
	{
		this.serviceProvider = serviceProvider;
	}

	public object GetService(Type serviceType)
	{
		return this.serviceProvider.GetService(serviceType);
	}

	public IEnumerable<object> GetServices(Type serviceType)
	{
		return this.serviceProvider.GetServices(serviceType);
	}
}

Above is the bare minimum code requied for implementing the dependency injection.

We could improvise as below and write some generic code for including all the controllers.

public class Global : HttpApplication
{
	void Application_Start(object sender, EventArgs e)
	{
		// Code that runs on application startup
		AreaRegistration.RegisterAllAreas();
		GlobalConfiguration.Configure(WebApiConfig.Register);
		RouteConfig.RegisterRoutes(RouteTable.Routes);

		var services = new ServiceCollection();
		ConfigureServices(services);
		var defaultResolver = new DefaultDependencyResolver(services.BuildServiceProvider());
		DependencyResolver.SetResolver(defaultResolver);
	}

	private void ConfigureServices(ServiceCollection services)
	{
		services.AddTransient(typeof(IRepo), typeof(DBRepo));

		services.AddMvcControllers("*");

		/*		services.AddControllersAsServices(typeof(Global).Assembly.GetExportedTypes()
		.Where(t => !t.IsAbstract && !t.IsGenericTypeDefinition)
		.Where(t => typeof(IController).IsAssignableFrom(t)
		|| t.Name.EndsWith("Controller", StringComparison.OrdinalIgnoreCase)));
		*/
	}
}

Below is the implementation for the extension methods on IServiceCollection.

    public static class ServiceProviderExtensions
    {
        private const string DefaultControllerFilter = "*Controller";
        /*
        public static IServiceCollection AddControllersAsServices(this IServiceCollection services, IEnumerable<Type> serviceTypes)
        {
            foreach (var type in serviceTypes)
            {
                services.AddTransient(type);
            }

            return services;
        }
        */
        public static void AddMvcControllers(this IServiceCollection serviceCollection, params string[] assemblyFilters)
        {
            serviceCollection.AddMvcControllers(GetAssemblies(assemblyFilters));
        }
        private static Assembly[] GetAssemblies(IEnumerable<string> assemblyFilters)
        {
            var assemblies = new List<Assembly>();
            foreach (var assemblyFilter in assemblyFilters)
            {
                assemblies.AddRange(AppDomain.CurrentDomain.GetAssemblies().Where(assembly => IsWildcardMatch(assembly.GetName().Name, assemblyFilter)).ToArray());
            }
            return assemblies.ToArray();
        }

        private static bool IsWildcardMatch(string input, string wildcard)
        {
            return input == wildcard || Regex.IsMatch(input, "^" + Regex.Escape(wildcard).Replace("\\*", ".*").Replace("\\?", ".") + "$", RegexOptions.IgnoreCase);
        }
        public static void AddMvcControllers(this IServiceCollection serviceCollection, params Assembly[] assemblies)
        {
            serviceCollection.AddMvcControllers(assemblies, new[] { DefaultControllerFilter });
        }

        private static void AddMvcControllers(this IServiceCollection serviceCollection, IEnumerable<Assembly> assemblies, string[] classFilters)
        {
            var controllers = GetTypesImplementing(typeof(IController), assemblies, classFilters);

            foreach (var controller in controllers)
            {
                serviceCollection.Add(controller, Lifetime.Transient);
            }
        }

        public static void Add(this IServiceCollection serviceCollection, Type type, Lifetime lifetime)
        {
            switch (lifetime)
            {
                case Lifetime.Singleton:
                    serviceCollection.AddSingleton(type);
                    break;
                case Lifetime.Transient:
                    serviceCollection.AddTransient(type);
                    break;
                default:
                    throw new ArgumentOutOfRangeException(nameof(lifetime), lifetime, null);
            }
        }

        private static IEnumerable<Type> GetTypesImplementing(Type implementsType, IEnumerable<Assembly> assemblies, params string[] classFilter)
        {
            var types = GetTypesImplementing(implementsType, assemblies.ToArray());
            if (classFilter != null && classFilter.Any())
            {
                types = types.Where(type => classFilter.Any(filter => IsWildcardMatch(type.FullName, filter)));
            }
            return types;
        }

        private static IEnumerable<Type> GetTypesImplementing(Type implementsType, params Assembly[] assemblies)
        {
            if (assemblies == null || assemblies.Length == 0)
            {
                return new Type[0];
            }

            var targetType = implementsType;

            return assemblies
                .Where(assembly => !assembly.IsDynamic)
                .SelectMany(GetExportedTypes)
                .Where(type => !type.IsAbstract && !type.IsGenericTypeDefinition && targetType.IsAssignableFrom(type))
                .ToArray();
        }

        private static IEnumerable<Type> GetExportedTypes(Assembly assembly)
        {
            try
            {
                return assembly.GetExportedTypes();
            }
            catch (NotSupportedException)
            {
                // A type load exception would typically happen on an Anonymously Hosted DynamicMethods
                // Assembly and it would be safe to skip this exception.
                return Type.EmptyTypes;
            }
            catch (FileLoadException)
            {
                // The assembly points to a not found assembly - ignore and continue
                return Type.EmptyTypes;
            }
            catch (ReflectionTypeLoadException ex)
            {
                // Return the types that could be loaded. Types can contain null values.
                return ex.Types.Where(type => type != null);
            }
            catch (Exception ex)
            {
                // Throw a more descriptive message containing the name of the assembly.
                throw new InvalidOperationException(string.Format(CultureInfo.InvariantCulture, "Unable to load types from assembly {0}. {1}", assembly.FullName, ex.Message), ex);
            }
        }
    }

    public enum Lifetime
    {
        Transient,
        Singleton
    }

Use the required namespaces.

Put a break-point in HomeController constructor. Run the application in debug mode, you will see the concrete instance DBRepo is assigned to IRepo.

That’s all. Please let me know if you found it to be helpful. If yes, then please do like it and share it with your colleagues. Also, do let me know if you have any suggestion in the comment section below. Do follow this blog if you want to receive notification for the future blog posts. Thank you so much.

Setup Sonar in local step by step

Sonar Setup
SonarQube is the central place to manage code quality, offering visual reporting on and across projects and enabling to replay the past to follow metrics evolution.
In this post, we will see how to set up Sonar in local machine step by step (for .NET). So, let’s start.

  1. Create a folder somewhere. In my case, it is C:\sonar.
  2. Download SonarQuebe from here.
    sonardownload
    Sonar Download

    Extract the zip file and copy sonarquebe folder from it to C:\sonar.
  3. Rename it to sonarqube for simplicity.
  4. So, in my case, it is C:\sonar\sonarqube. This has sonarquebe folders like bin and others.
  5. Download Sonar CSharp plugin from here.
    sonarcsharp
    Sonar CSharp Plugin
  6. Copy the plugin jar file in C:\sonar\sonarqube\extensions\plugins.
  7. Download JRE from here. In my case, I have windows 64 bit. So, I downloaded Windows x64 Offline version.
  8. Install it. Note down the path of Directory where you have installed the Java JRE. In my case, it is C:\Program Files\Java\jre1.8.0_111.
  9. Set system environment variable JAVA_HOME with above path as value. Click here to see how to set an environment variable.
  10. Update system PATH variable with ;%JAVA_HOME%\bin. Click here to see how to update the PATH variable.
  11. Download Sonar Runner from here.
  12. Unzip the file and rename the inside folder to sonar-runner for simplicity. Copy the sonar-runner folder to C:\Sonar folder. So, in my case, it will be C:\sonar\sonar-runner which has a bin folder.
  13. Set system environment variable SONAR_RUNNER_HOME to C:\sonar\sonar-runner.
  14. Update system PATH variable with ;%SONAR_RUNNER_HOME%\bin. NOTE: Values are separated by a semi-colon (;).
  15. Go to C:\sonar\sonar-runner\conf. Open sonar-runner.properties in notepad. Uncomment below the line by removing hash.
    	sonar.sourceEncoding=UTF-8
  16. Go to C:\sonar\sonarqube\conf. Open wrapper.conf in notepad. Update wrapper.java.command as below.
    	wrapper.java.command=%JAVA_HOME%\bin\java
  17. Now We will create sonar project properties files for each project. This file will have information regarding the project source code location. So, let’s create a folder somewhere. E.g. C:\TestSonar. Go inside the new folder. Right-click and create an empty file named sonar-project.properties and provide following content.
    	sonar.projectKey=TestProject1
    	sonar.projectVersion=1.0
    	sonar.projectName=TestProject1
    
    	sonar.sources=E:/sandeep/websites/TestProject1
    	sonar.language=cs
    
    	sonar.projectBaseDir=E:/sandeep/websites/TestProject1
    	sonar.dotnet.visualstudio.solution.file=TestProject1.sln
    	sonar.dotnet.4.0.sdk.directory=C:/WIndows/Microsoft.NET/Framework/v4.0.30319
    	sonar.dotnet.version=4.0
    	sonar.working.directory=C:/TestSonar/sonarworkingdir

    We have provided sonarworkingdir directory as working directory. So, create sonarworkingdir folder in TestSonar folder. Basically, if you don’t provide this property then .sonar folder will be created within the project folder given in sonar.projectBaseDir.

    Note: Do provide forward slash in path.

  18. Go to C:\sonar\sonarqube\bin\windows-x86-64 and run StartSonar.bat with admin. Wait for some time till it is up and running.
    startsonar
    StartSonar.Bat
  19. Go to C:\TestSonar where you have created the sonar-project.properties file. Run cmd as an admin here and execute the sonar-runner command.
  20. You can view the Sonar dashboard by localhost:9000 in the browser.

FAQ:

  1. How to setup Sonar for multiple projects?
    sonarmultipleprojects
    Sonar Multiple Projects

    I would suggest creating new folders named after each project. Create sonar project properties files for each project in their respective folders which will have project specific information. This helpful when you have multiple projects source codes lying in different drives or folders. Then write a batch script that will start from TestSonar folder and go inside of TestProject folders and execute sonar-runner one by one.

    In case you have a parent folder where multiple projects folders are residing then you can refer this link.
  2. How to move “.sonar” folder created in Project folder?
    Use sonar.working.directory in sonar project properties file as shown in above example. Beware: the specified folder is deleted before each analysis. I did not see any side effects of this deletion so far.
  3. What is the difference between sonarquebe and sonar-runner?
    SonarQube (formerly just “Sonar”) is a server-based system. Of course, you can install it on your local machine (the hardware requirements are minimal). But it is a central server with a database. Analyses are performed by some Sonar “client” software, which could be the sonar-runner, the sonar ant task, the sonar Eclipse plugin etc. The analysis results can be automatically uploaded to the server, where they can be accessed via the sonar Web application.(Reference)
  4. How to resolve the Wrapper stopped error?
    Run task manager as admin, and end all java.exe tasks.
    Or run cmd as admin and execute below command.
    taskkill.exe /F /IM java.exe
  5. How to resolve: ERROR: Caused by: Start pointer [line=1, lineOffset=0] should be before end pointer [line=1, lineOffset=0].
    sonarfailure_startpointer
    Sonar Runner Failure

    It has a problem with C# plugin version. (Reference)
    Go to C:\sonar\sonarqube\extensions\plugins.
    Delete sonar-csharp-plugin-5.5.0.479.jar if it is there.
    Click here to download sonar-csharp-plugin-5.3.2-RC1.jar. (Reference)
    Copy sonar-csharp-plugin-5.3.2-RC1.jar to the plugins folder.
  6. Others properties in Sonar project property file
    Click here to read more about sonar properties file.

Hope this helps. Please do provide your valuable feedback in comments below. It will help me improve the blog content.

Special Thanks to my colleagues – Praveen Rekhapalli and Akshatha Shetty.

File content not deleted completely

Challenge: We had a program that requests new xml content and write it in files. One day we started getting xml parsing error while parsing xml content from a file.

Solution: Upon investigation we found that new content is written, but old content last few lines does not get deleted as new content lines were less than old content lines. If you have new content lines greater than old content lines then there wont be any issue.

First of all, lets regenerate issue. Following code does that.

        static void Main(string[] args)
        {
            Console.WriteLine("Enter file path: ");
            string filePath = Console.ReadLine();

            StringBuilder stringBuilder = new StringBuilder();
            stringBuilder.AppendLine("Hello");
            stringBuilder.AppendLine("World");

            //Writing content first time
            WriteContent(filePath, stringBuilder.ToString());
            //File.WriteAllText(filePath, stringBuilder.ToString());

            Console.WriteLine(File.ReadAllText("temp.txt"));

            stringBuilder = new StringBuilder();
            stringBuilder.AppendLine("Hi");

            //Writing content second time. Note here content is shorter than first time
            WriteContent(filePath, stringBuilder.ToString());
            //File.WriteAllText(filePath, stringBuilder.ToString());

            Console.WriteLine(File.ReadAllText(filePath));
        }

        private static void WriteContent(string file, string content)
        {
            FileStream fileStream = null;
            StreamWriter writer = null;
            try
            {
                //FileMode.Create and FileMode.OpenOrCreate 
                fileStream = File.Open(file, FileMode.OpenOrCreate, FileAccess.Write, FileShare.ReadWrite);
                writer = new StreamWriter(fileStream);
                writer.Write(content);
                writer.Flush();
            }
            catch (Exception)
            {
                //log error
            }
            finally
            {
                if (writer != null)
                    writer.Close();
                if (fileStream != null)
                    fileStream.Close();
            }
        }

Run above code and you can see oworld word is left. Not completely removed.

output1
Output 1 – FileMode.OpenOrCreate

OpenOrCreate

Specifies that the operating system should open a file if it exists; otherwise, a new file should be created. If the file is opened with FileAccess.Read, FileIOPermissionAccess.Read permission is required. If the file access is FileAccess.Write, FileIOPermissionAccess.Write permission is required. If the file is opened with FileAccess.ReadWrite, both FileIOPermissionAccess.Read and FileIOPermissionAccess.Write permissions are required.

Now remove FileMode.OpenOrCreate and provide FileMode.Create.
Run and it overwrites completely.

output2
Output 2 – FileMode.Create

Create

Specifies that the operating system should create a new file. If the file already exists, it will be overwritten. This requires FileIOPermissionAccess.Write permission. FileMode.Create is equivalent to requesting that if the file does not exist, use CreateNew; otherwise, use Truncate. If the file already exists but is a hidden file, an UnauthorizedAccessException exception is thrown

Summary:

  1. So always use FileMode.Create in File.Open() to overwrite content completely.
  2. You can also use File.WriteAllText() method.

References:

https://msdn.microsoft.com/en-in/library/system.io.filemode%28v=vs.110%29.aspx