The objective of this post is to set up load balancing mechanism between two sites in local using IIS.
This can be helpful for the developer to reproduce issues related to the session, how static values initialization affects user experience, or load balancing in local, etc. Briefly, how the application behaves in a load balancing environment.
This post assumes the developer has already installed IIS with asp.net enabled.
Install the following IIS extensions.
- URL Rewrite – https://www.iis.net/downloads/microsoft/url-rewrite
- Application Request Routing – https://www.iis.net/downloads/microsoft/application-request-routing
Now Let’s set up two sites and load balancing for them.
- Run IIS Manager as Admin.

Here we can see the Application Request Routing module and URL Rewrite module. Also, you can find the Server Farm node. Add a Default Web Site in your IIS if not present. Provide the following bindings for Default Web Site.

2. We need to add two sites. Right-click Sites node. Click Add Website.

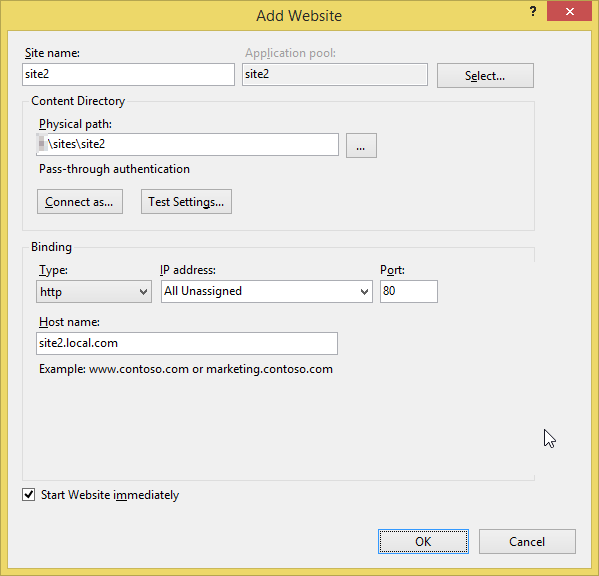
In my case, both the site1 and site2 folders have a Default.aspx file containing content as Site1 and Site2 respectively. So, when a request made to the default page, we will know which site is serving the request.
Run notepad as Admin. Open C:\windows\system32\drivers\etc\hosts. Make the following host entries.
127.0.0.1 site2.local.com
127.0.0.1 site1.local.com
127.0.0.1 mainsite.local.com
mainsite.local.com will be the main hostname which will be used while making requests.
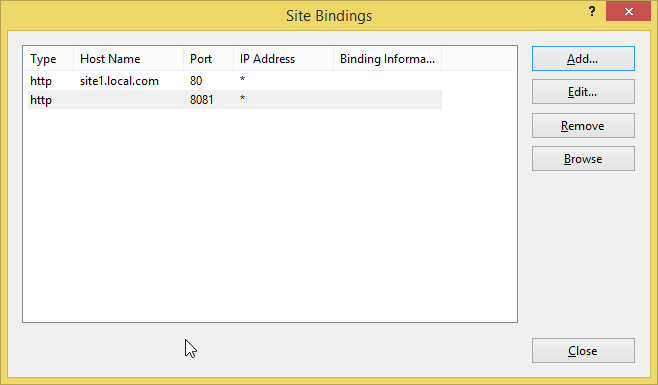
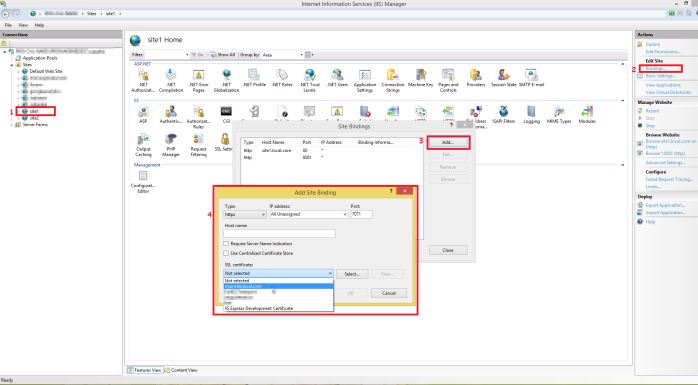
3. Add one more binding to each of these sites with different port numbers as shown in below images.
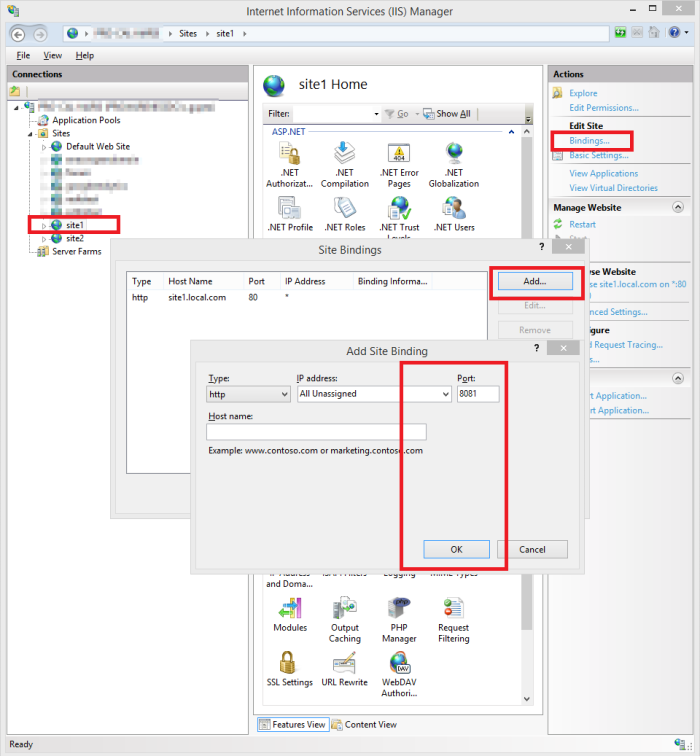
We provided site1 bindings with port number 8081, empty hostname and IP as All Unassigned.
Similarly, provide site2 binding with port number 8082.
4. We will create a Server Farm. Right-click on Server Farm node. Click Create Server Farm.
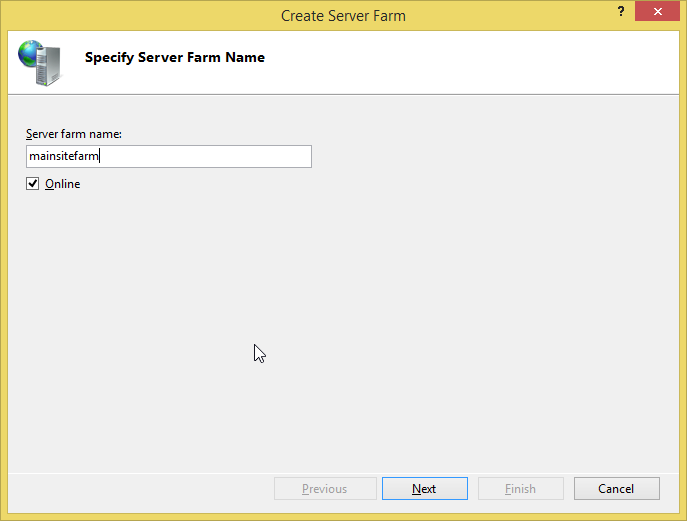
Provide server farm name and click Next.
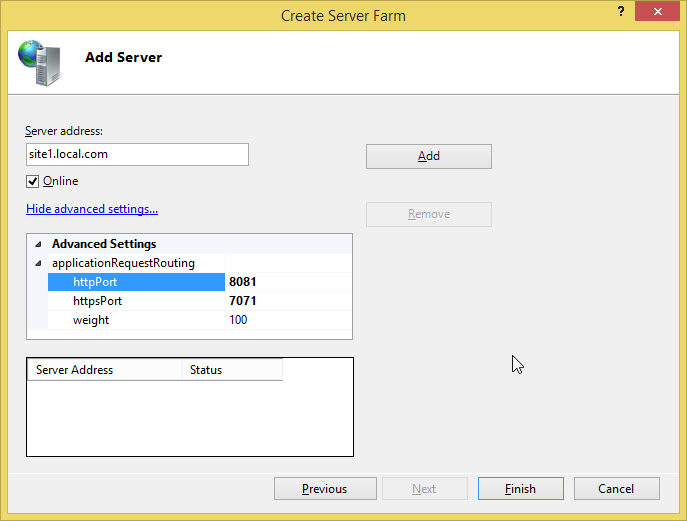
Here, provide site1.local.com in the server address. Expand the Advance Settings below. Provide httpPort and httpsPort as 8081 and 7071 respectively. Click Add Button.
Later in this post, we will create a self-signed certificate for these two domains and use that for https. Since we cannot edit this information once a server is added, we are providing httpsPort here right now.
Similarly, add second server representing site2 as shown below.
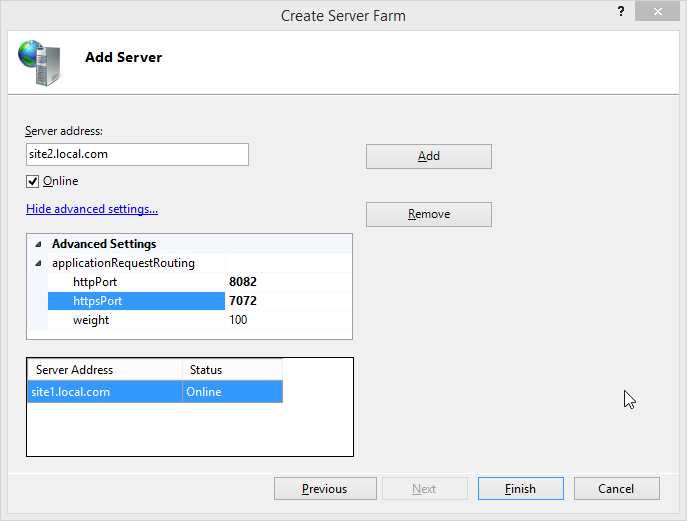
So, we have considered httpPort and httpsPort as 8082 and 7072 respectively for the second server.
After adding the second server, click Finish following message pops up.

Click OK here. As it mentions this will create a rule which will route requests to the newly created server farm.
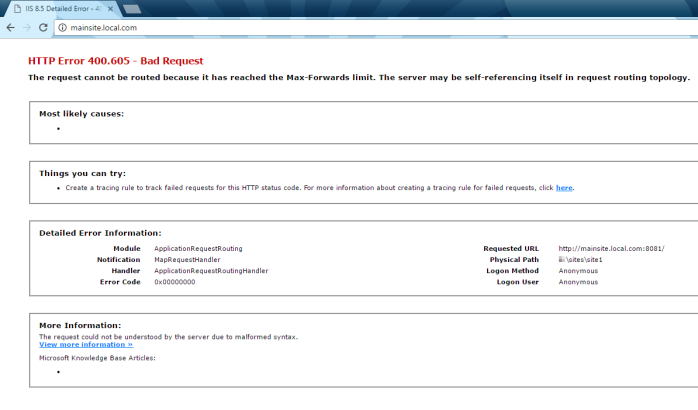
If you try to open http://mainsite.local.com then it will give the following error.
HTTP Error 400.605 – Bad Request
The request cannot be routed because it has reached the Max-Forwards limit. The server may be self-referencing itself in the request routing topology.
Upon google search regarding the above error, we found below the post.
Since we have both the servers in local, we need to set port number settings of a URL rewrite rule to serve only for requests at given port.
Go to IIS Home node. Click URL Rewrite icon in the IIS section.

Double click the rule. It will open the following.
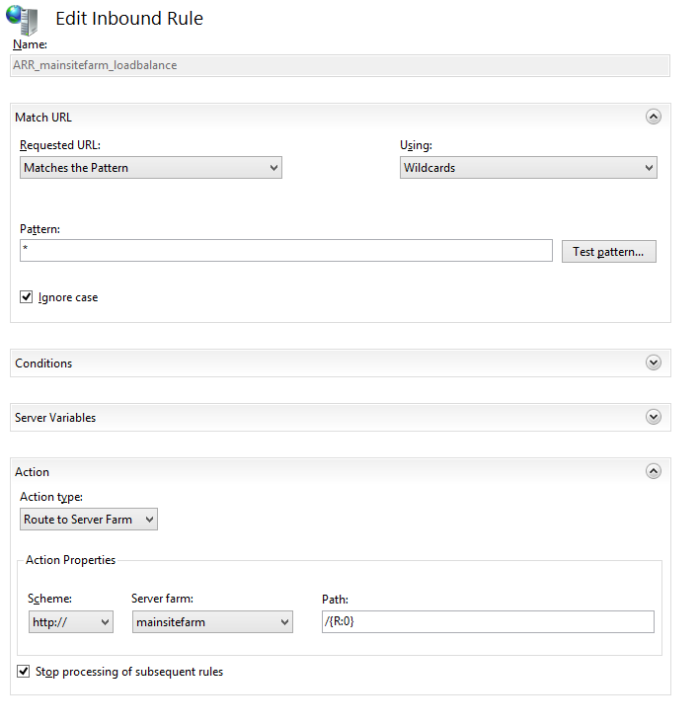
Expand Conditions Accordion.
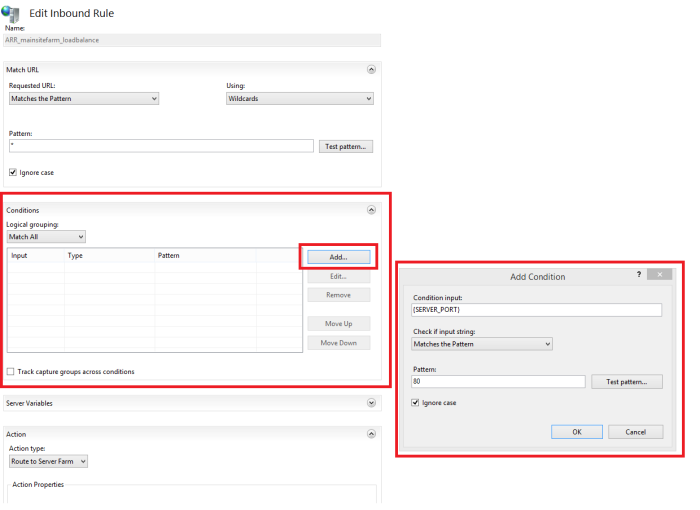
Click Add button. Provide {SERVER_PORT} as 80 in condition. Click OK. Click Apply in the right pane.
Open http://mainsite.local.com in a browser. Now the page should load, showing either Site 1 or Site 2. Since the sticky session is disabled, it will keep changing i.e. the server will keep changing.
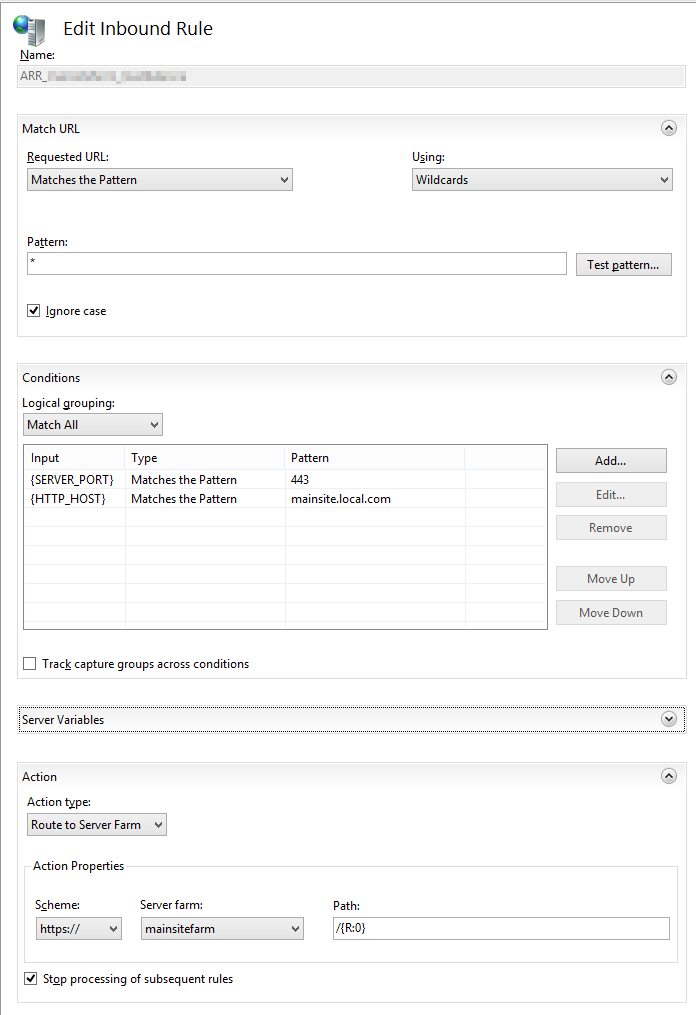
5. Load balancing HTTPs sites
Go to IIS Home node. Click URL Rewrite icon in the IIS section. Double click the rule if you have. Or Add a blank rule. Provide the settings in a rule as shown below.
Create a self-signed certificate.
Run PowerShell with Admin. Run the following command.
New-SelfSignedCertificate -DnsName mainsite.local.com,site1.local.com,site2.local.com –
CertStoreLocation cert:\LocalMachine\My

Assigning HTTPs Bindings
Provide https bindings for Default Web Site with port 443 and select the mainsite.local.com from SSL Certificate dropdown.
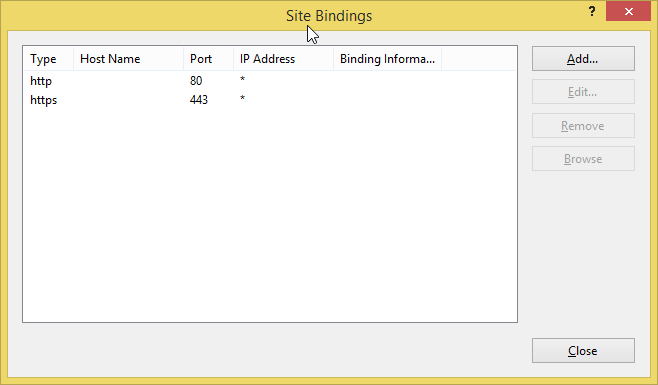
Select mainsite.local.com from the dropdown. And click OK.
Also, do the same for Site2 with port 7072.
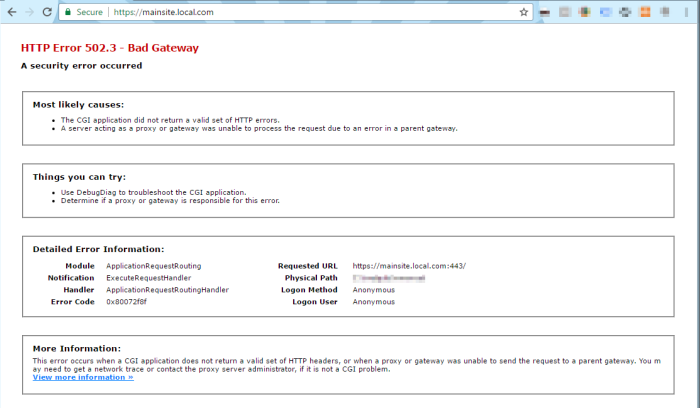
To resolve the above issue, this link from google was helpful.
http://kundankarma.blogspot.in/2015/07/problem-statement-whenever-you-are.html
Run Certlm. In personal certificate, we see mainsite.local.com.
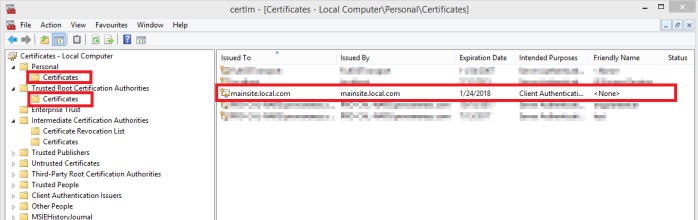
Right-click mainsite.local.com and click copy. Right-click Certificates under Trusted Root
Certification Authorities and click paste.
Now try reloading the page. It should load now and show either Site 1 or Site 2. Since the sticky session is disabled, it will keep changing i.e. the server will keep changing.
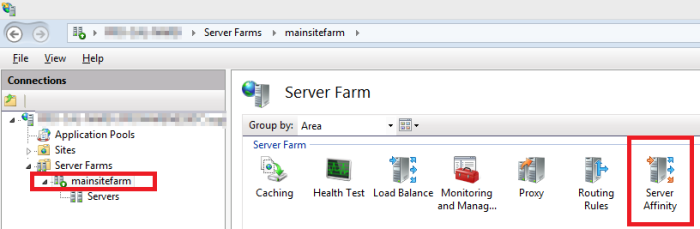
Enable Sticky Session
If you are not using session state server then you may enable sticky session. To do so, go to server farm node. Double click Server Affinity Icon.
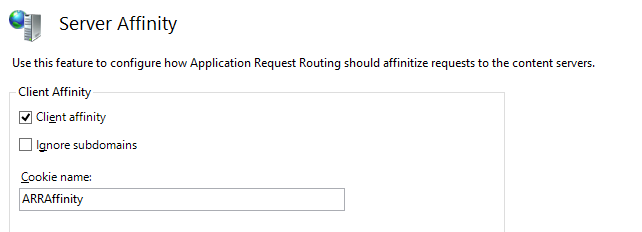
Check Client affinity and click apply in the right pane.
Now it should retain the session.
Food for thought 🙂
Delete the existing certificates. Try creating a new self-signed certificate as given below. Run PowerShell with Admin. Run the following command.
New-SelfSignedCertificate -DnsName mainsite.local.com -CertStoreLocation
cert:\LocalMachine\My
Since the certificate is deleted, copy the certificate from Personal Certificates to Trusted Root
Certification Authorities from Certlm. Reassign the certificate in IIS Sites bindings. And test it whether it works or not. Enjoy!
Thanks to my colleague – Praveen Rekhapalli who figured out this trick.
Hope this helps.
Happy Load Balancing 🙂
